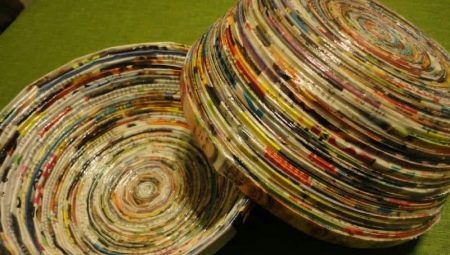
Greater popularity acquired hand-made interior items. In their manufacture all available available materials and accessories are used. Such a creative process requires a considerable amount of free time, but the result always exceeds expectations. We suggest you to make candy boxes from newspaper tubes with your own hands.
Features
Paper weaving has one big advantage. Paper has a much smaller weight than a vine, and its products are lighter.
Also the paper rod is more resilient and able to withstand steeper bends.that gives new opportunities when weaving.
This made it possible to manufacture small items.
Paper wicker products are elegant and very beautiful.
With proper tinting it is very difficult to distinguish them from objects made from natural wicker. Basically, small items are made in this way for interior decoration.
They serve as an addition to the atmosphere of coziness and comfort in the house. Below is a master class on making several pieces of paper vines.
Vine from newspaper tubes
The first step is to prepare a paper vine. For beginners, consider step by step making vines from newsprint.
The following materials and devices will be involved in this process:
- paper or newspapers;
- clerical knife;
- scissors;
- PVA glue;
- small brush;
- knitting needles with a diameter of 2 mm;
- acrylic lacquer.
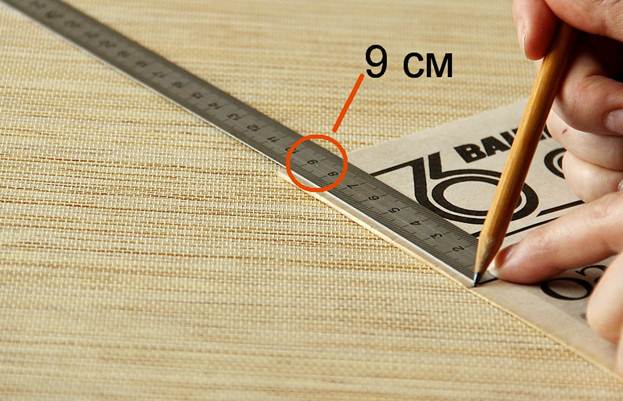
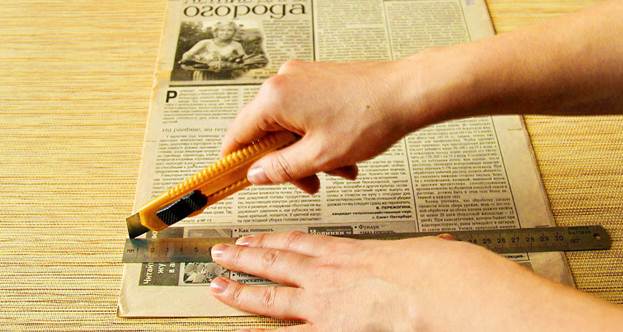
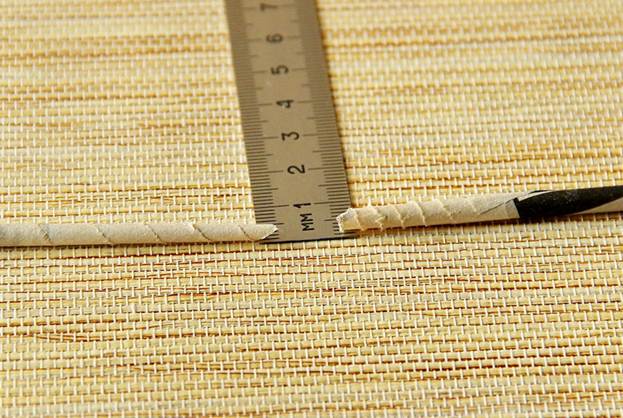
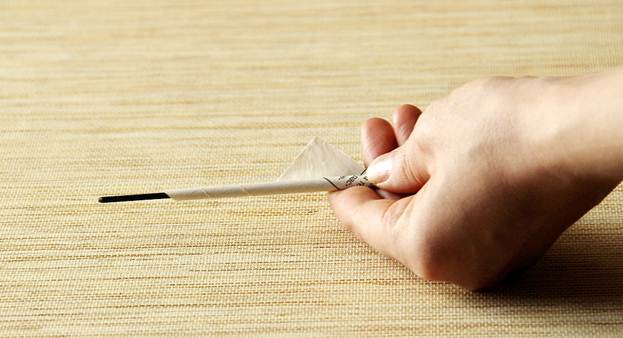
So, you need to take a newspaper and cut it along the fold line. On the resulting sheet mark a strip width of 7-8 cm, and fold it across. Cut along the fold line. It should be a strip 7-8 cm wide and about 30 cm long.
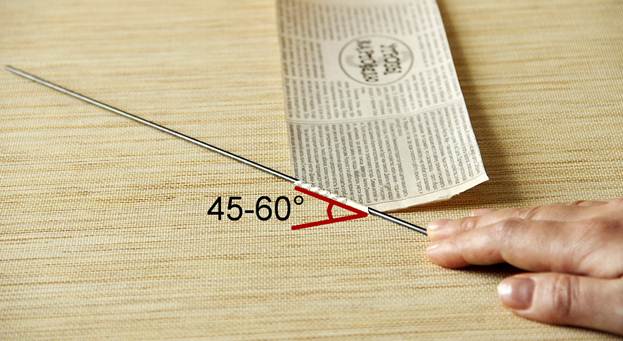
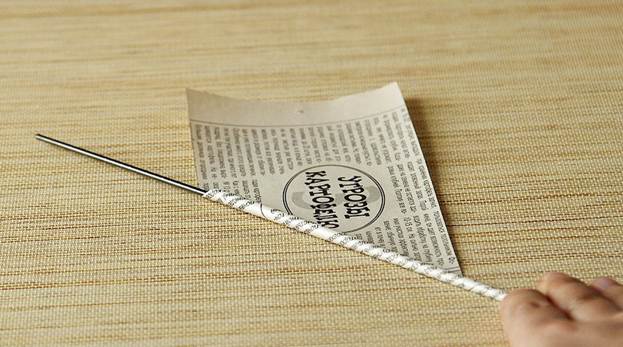
Place a piece of paper on a flat hard surface. Take a knitting needle, put it on the edge of a prepared sheet of paper at an angle of 20-30 degrees. Holding a piece of paper with one crayfish, with the other we start to wind it on a needle. Gently press the sheet to the spoke, so that the tube turns out to be rather dense.
It is necessary to wind the paper so that the ends of the tube turned out to be of different diameters - one is slightly larger than the other.
It is necessary to build paper vines. It will be inserted end with a smaller diameter into the end of another tube with a larger diameter.
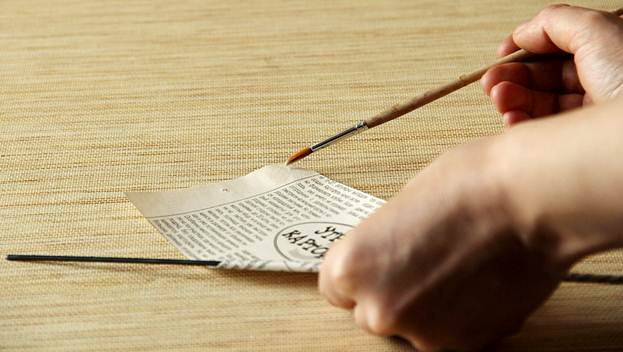
At the end of this process, there should remain a small corner of the paper, which must be lubricated with white glue and glued to a paper tube that has been rolled up on a spoke. Carefully remove the paper vines from the knitting needles and allow the glue to dry.
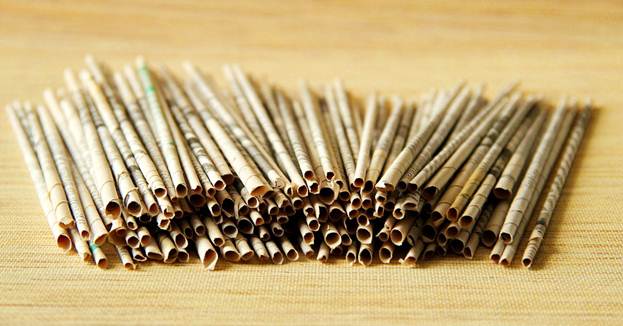
To make candy, you need about 50 of these newspaper tubes.
You should not hurry in the manufacture of such straws. The tubes should be tight enough to make the product durable.
For the final readiness of the tube it is necessary to paint.
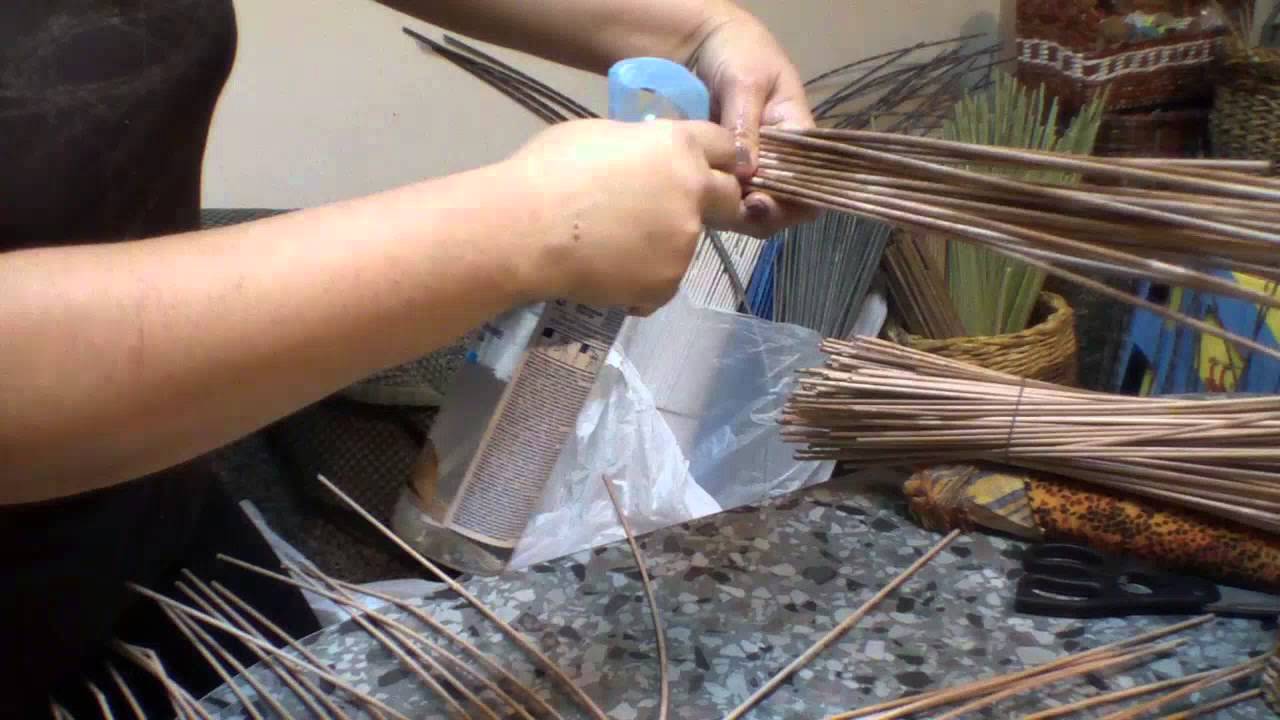
For this ideal stain based on water.
The rich color palette allows you to easily select the desired color. It is necessary to take a bundle of paper rod (15-20 pcs.) At one end, and lower the other into a container with stain. Then remove, drain the excess stain from the tubes and turn it over. Repeat the operation with the unpainted end of the bundle of paper vine.
After the tubes are completely painted, they must be dried.
It is necessary to catch such a moment, when the paper vine will be a little wet. This will give it a better elasticity, which is important when weaving.If the paper rod has dried out completely and has become firm and inflexible, then it is necessary to sprinkle it with water from a spray bottle.
It is necessary to wet the middle part so that the ends of the vines remain firm.
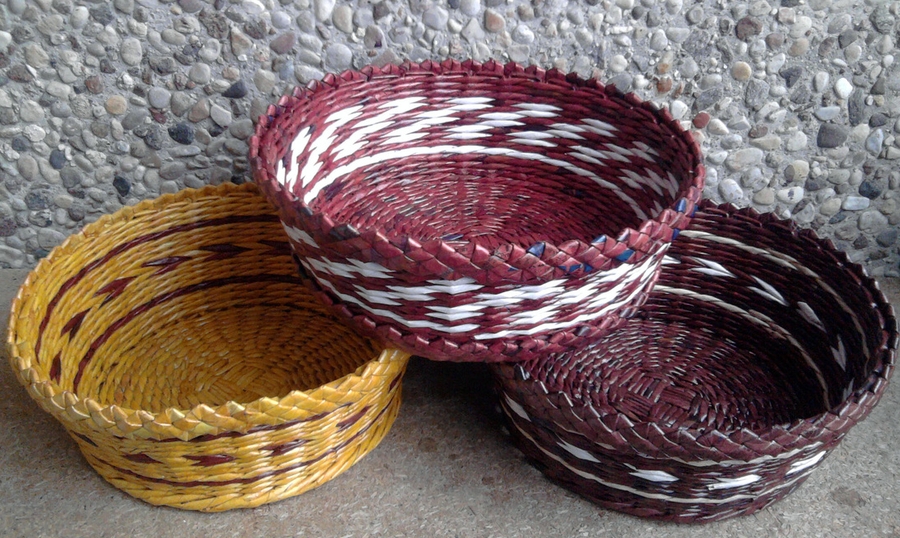
Cup candy
As mentioned above, to create a cup of candy we need a minimum of costs and materials. This product is very functional and practical. It really helps to add to the tea ceremony an additional charm, comfort and presence of something home and native.
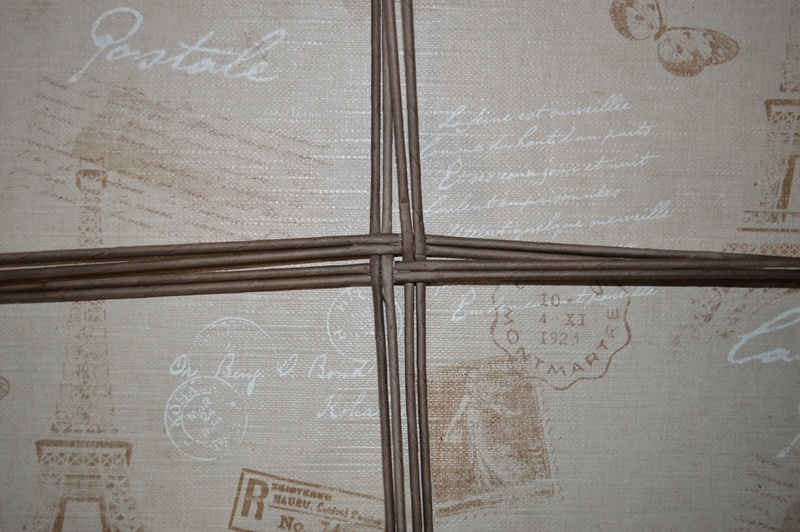
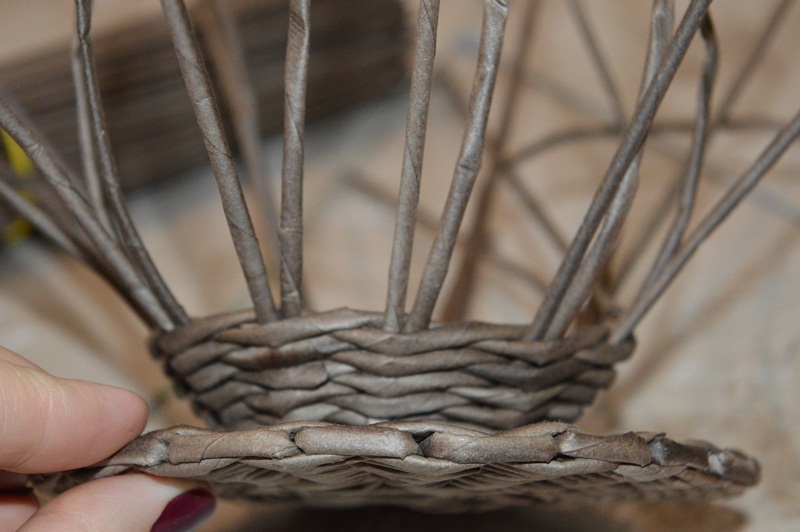
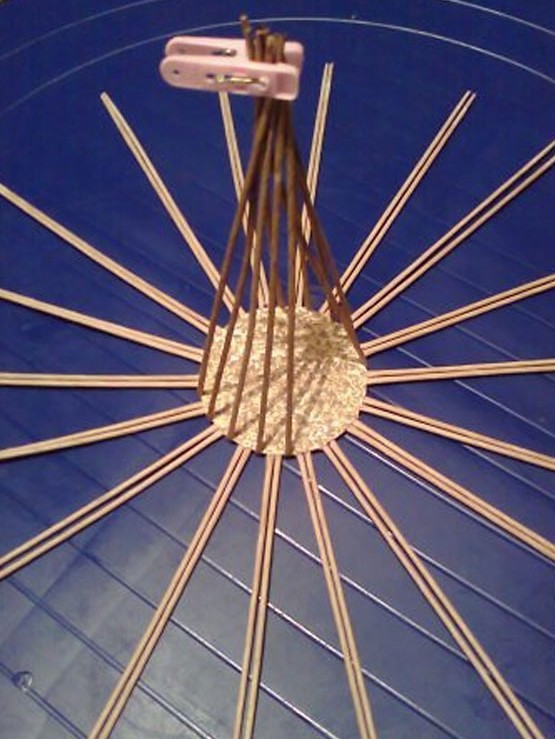
Weaving the cup starts from the bottom.
To do this, take four pairs of paper vines and twist them crosswise across the center. In places of the plexus a little grease with white glue. In the future, these tubes will be called guides.

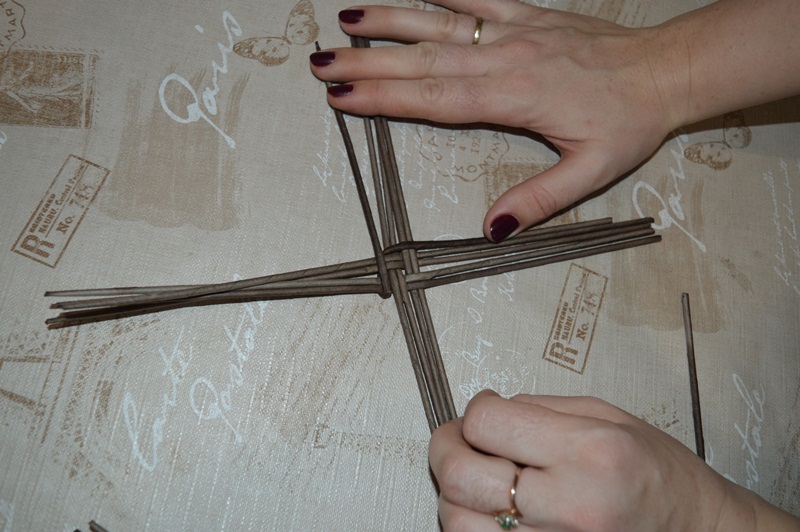
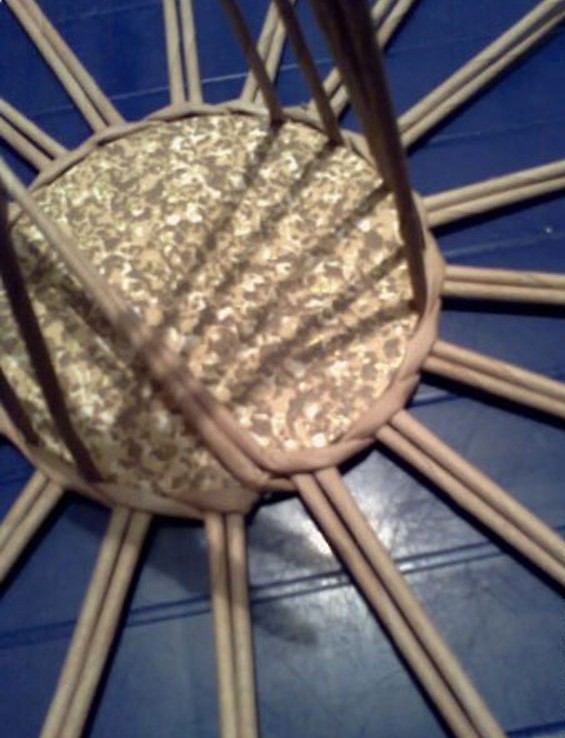
The next paper vine folded in half and put on 4 guides. Gently press it to the center of the plexus of the guides (middle of the bottom). The upper half of the tube is lowered down and skipped under the four adjacent rails. The bottom half is raised up and hold on top of the adjacent 4 guides. And so alternating in a circle. This method of weaving is called "rope".
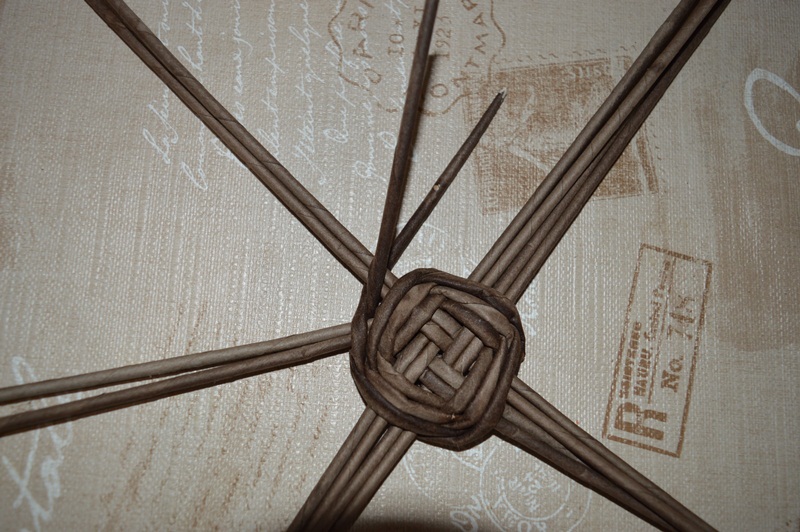
As weaving paper vine will end. To build up the tube, you need to drop the PVA glue into the hole of a larger diameter and insert a new vine into it.
From the other end of the straw, it is necessary to do the exact opposite - drop glue into the new vine and put it on the thin end of the ending tube. Pass by weaving 3-4 rows and separate the paired guides. Now you need to braid each guide.
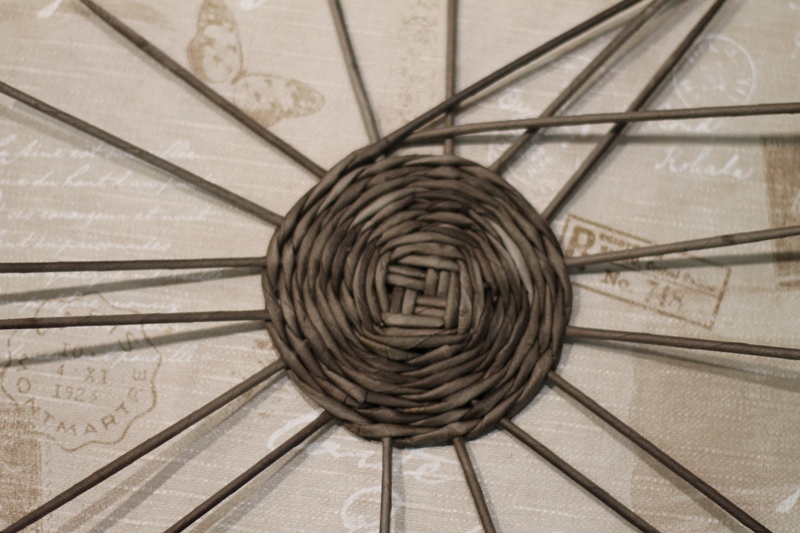
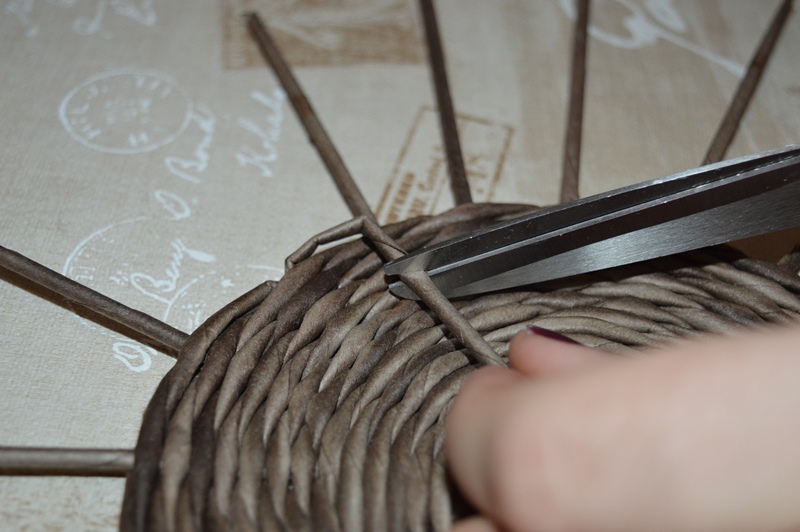
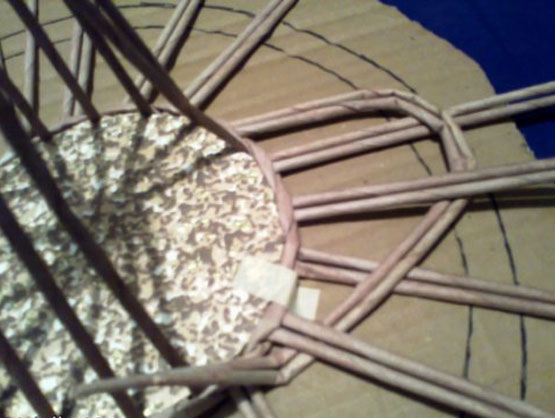
When the desired diameter of the saucer is reached, leave it on the working vine 1.5 cm each, the rest is cut off. The remaining ends with the needles are hidden in the weave.
To make our saucer look complete, you need to close the edge of the weave.
It is necessary to take the guide, bend it toward the next, make a bend at their intersection and, 2 cm from it, cut off the remainder. The resulting tail to fill next to the next guide. So do with all the guides in a circle.

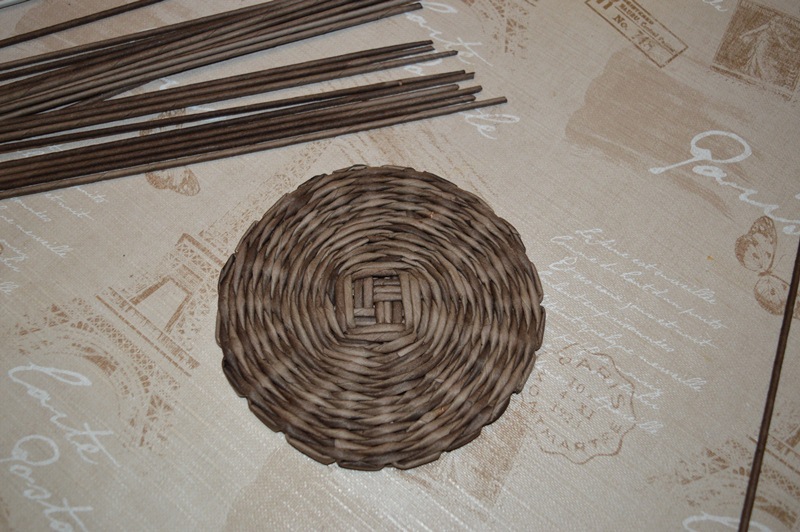
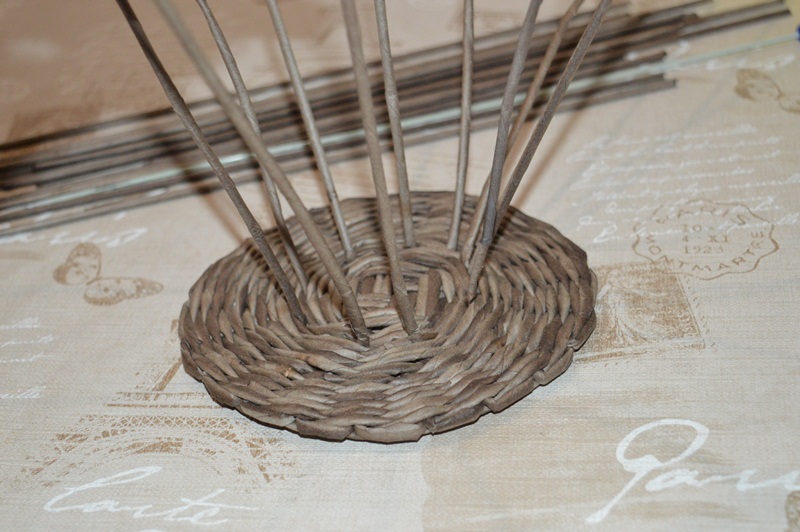
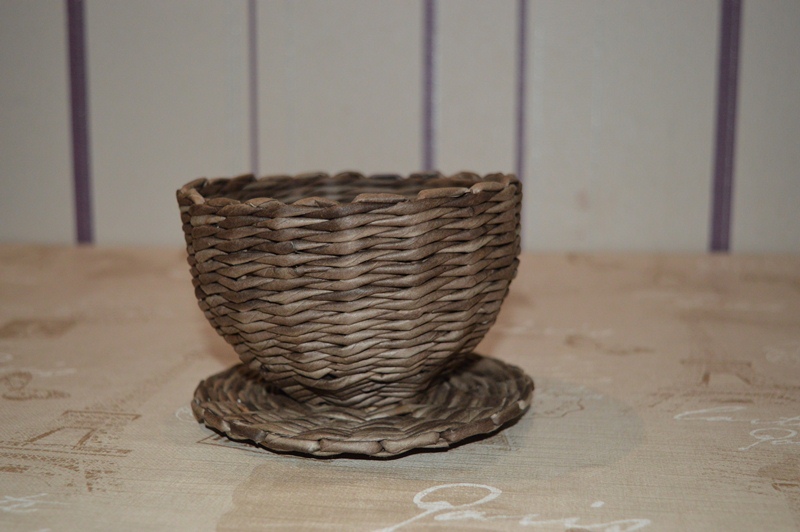
Bottom or saucer ready.
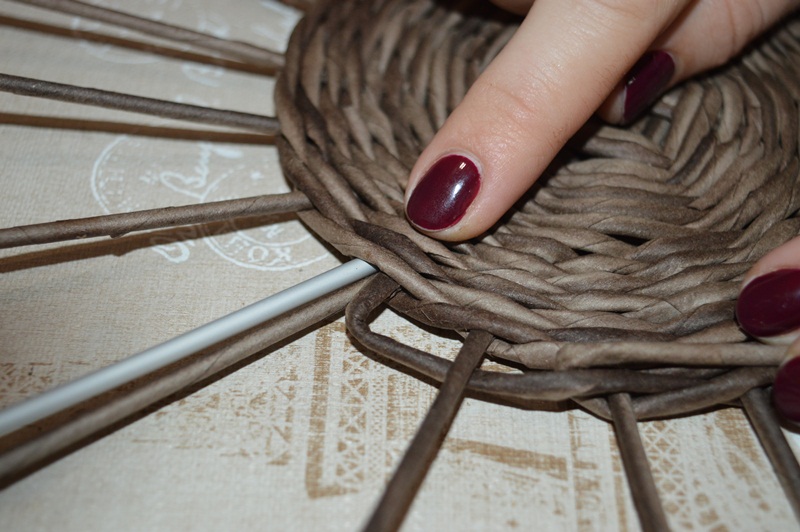
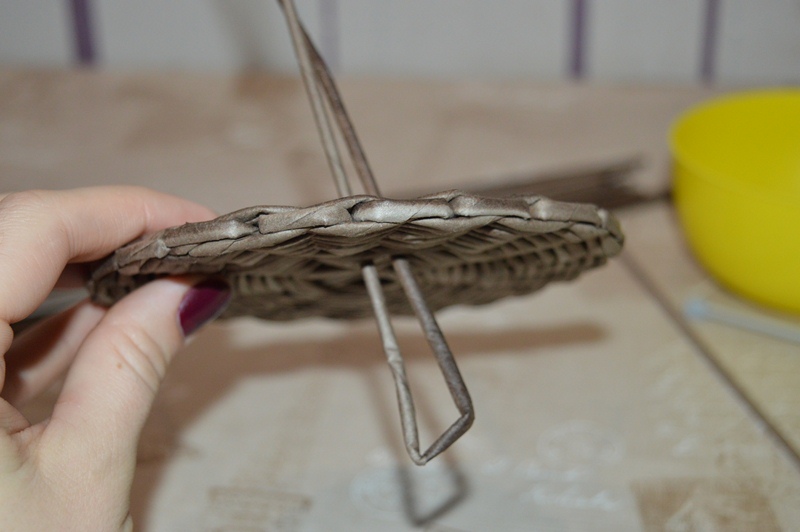
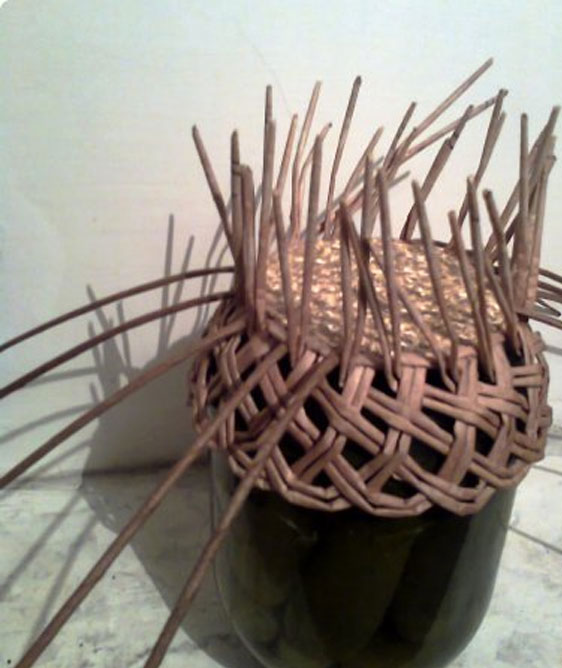
Weaving cups also begins with the installation of guides.
Paper vines fold in half and push them through the bottom through the saucer. Install them so that the cup guide wraps around the guide of the saucer. Then bend one tube and put it on the cup guide. We start weaving in the same way as weaving the bottom, only vertically.
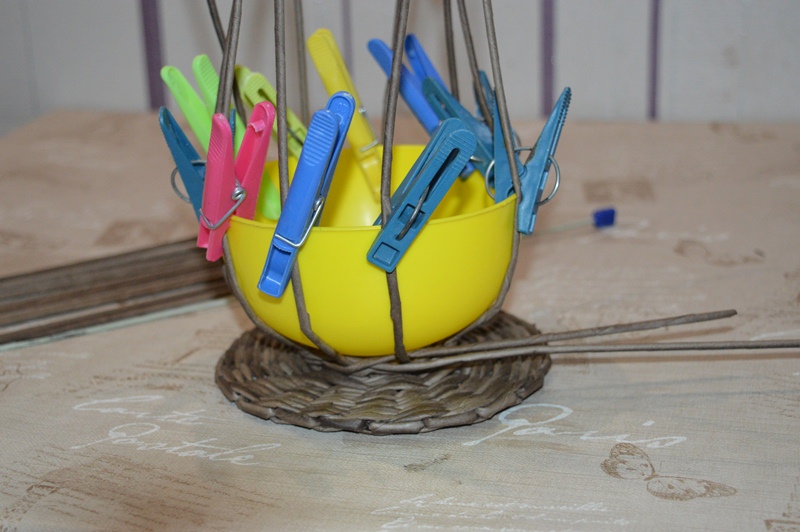
After 3 rows, you need to insert some form for flying. This can be any dishes in the form of a hemisphere.
The guides must be evenly distributed, pressed to the form and secured with clips or pins on the edges.
The distance between the guides should not exceed 3 cm, otherwise the weaving will be fragile. After reaching the desired height of the cup, finish the weaving in the same way as when weaving the saucer.
To weave a pen, you will need 3 paper vines.
2 tubes put parallel to each other. To one of them at a distance of 2 cm from the edge we glue the third vine. Give dry. Inside between the two tubes we insert two needles for stiffness. With the third vine we begin to twine the eights with the knitting needles, departing from the edge of 2 cm.
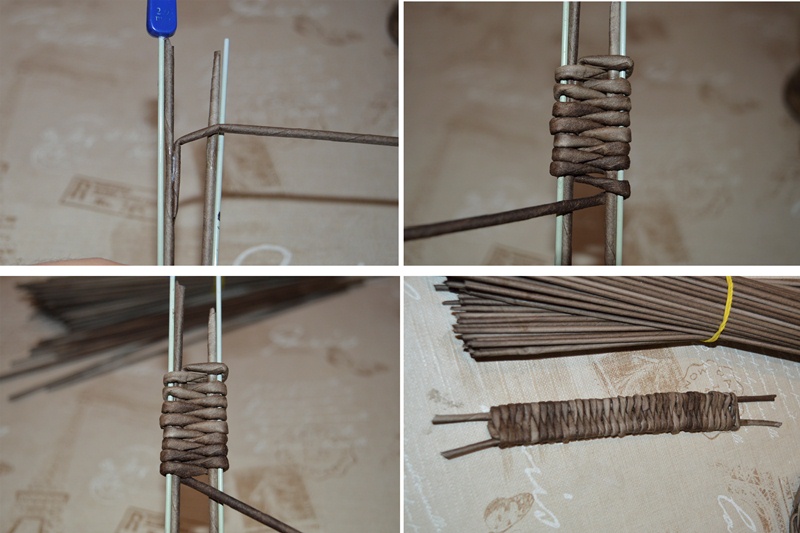
We finish the weaving also 2 cm to the edge of the vine. We carefully take out the knitting needles, fill the end of the third vine into weaving and glue it a little bit.
Wicker braid handle is ready, it remains to attach it to the cup. To do this, with the help of the spokes, the left ends of the handle, 2 cm each, are filled into the weaving in the upper part of the guide cup. We also do at the bottom. To stiffen the structure, we grease these places with white glue. Give the cup to dry completely.
To give strength to our candy cane, it is necessary to prime it.
To do this, dilute the PVA glue with water in a 1: 1 ratio and apply the solution with a brush over the entire product.

Dry well and the mug is ready.
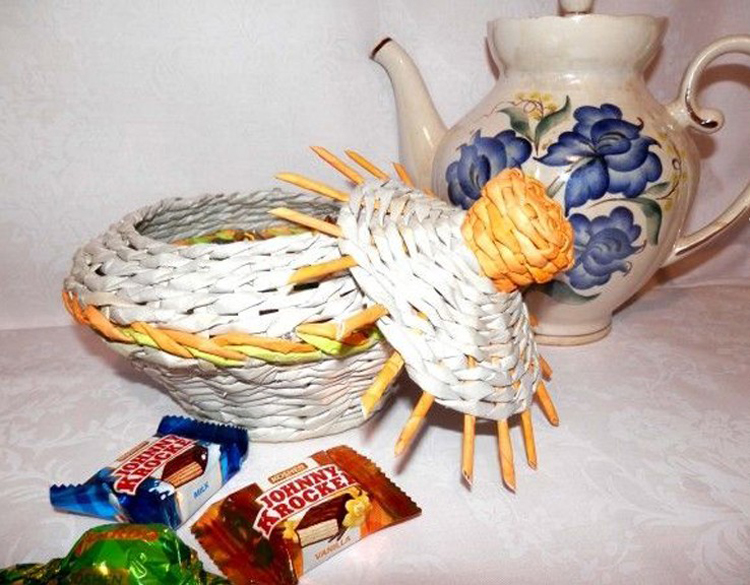
Vase
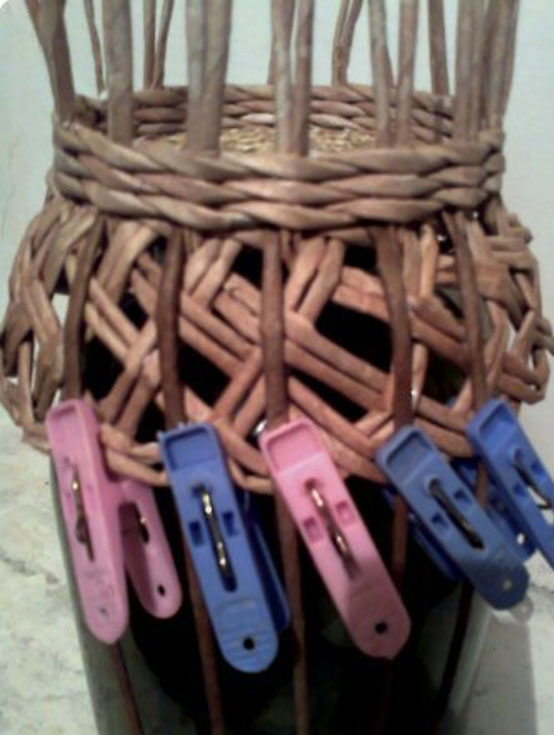
To weave an openwork vase for sweets does not take much time. It is necessary to begin with weaving the bottom.After the bottom has reached its size, take 5 guides through one on one side, 5 from the opposite side and lift them up. Secure them together at the top with a clip or clothespin. These are blanks for the future handle of the vase.
To perform openwork weaving, you need to take a paired guide and run it under the adjacent guide.
Then lift up the next guide, lower down under the other and up to the top. It should make a small semicircle.

So do with all the guides. All ends of the guides should go up.
To shape the vase, you must take a one-liter glass jar and place it on the bottom of the product.
Gently press the weave around the jar and turn it upside down. Tangle the remaining ends of the guides with three rows of weaving “rope” and finish the weaving in the same way as when making the bottom of the cup. This will be the stand of the vase.

We form the handle of the vase and wrap the upper parts with paper wicker. For durability lubricate with white glue.
Sweets box with lid
Making candy with a lid is absolutely the same as in the case with previous products. First you need to weave the bottom of a given size and then bend the guides up. Weave a “rope” to weave the necessary height of the candy bowl and finish the weaving.
At its core, the lid is the same bottom, with only a small handle in the center for easy opening.
Weave a cap with a diameter slightly larger than the diameter of the candy.
How to make candy boxes from newspaper tubes, see the video below.


